
# Vuex学习
# 00-事件总线
目的:掌握非父子组件之间数据通讯
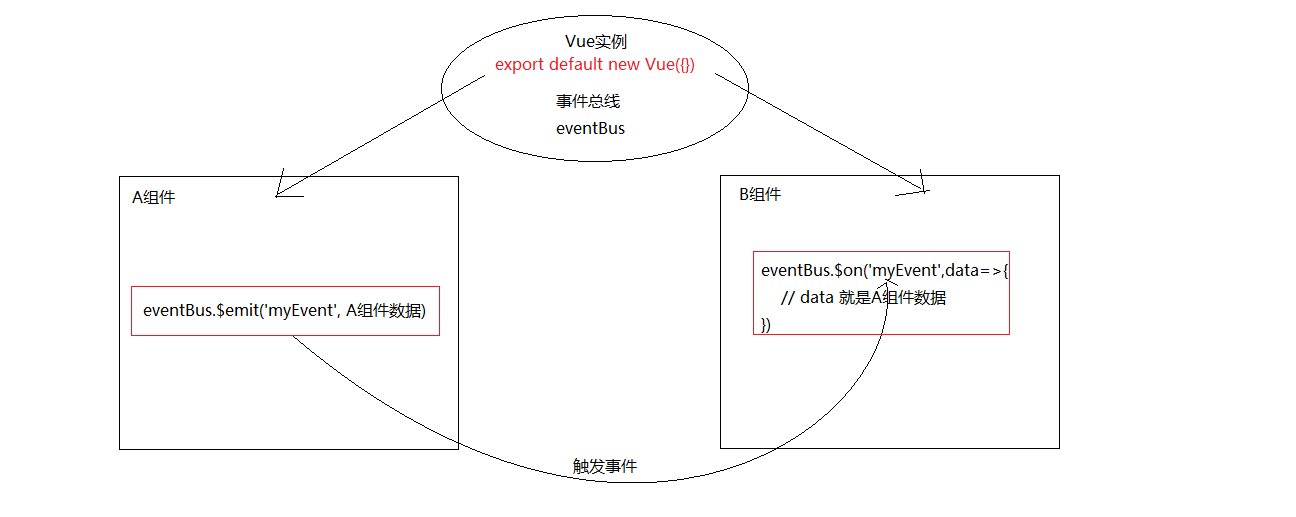
首先:明确一件事件,组件的自定义事件,只能由组件自己来触发。
然后:假设A组件想传值给B组件,AB组件的非父子。其实也是依赖自定义事件来传递。
- 在A组件触发一个自定义事件(myEvent),触发的时候可以传参,参数可以是A组件数据
- 在B组件触发绑定自定义事件(myEvent),事件的函数接收传参,参数其实是A组件数据
- 触发事件和绑定事件由另外一个组件负责,A导入它触发事件,B导入它绑定事件,满足自定义事件触发绑定条件。
- 另外一个组件:我们称为
事件总线或者eventBus
画图:
代码:
eventBus.js
import Vue from 'vue'
export default new Vue({})
com-a.vue
<template>
  <div>A组件 <button @click="toB">传递数据给B组件</button></div>
</template>
<script>
import eventBus from './eventBus.js'
export default {
  name: 'ComA',
  data () {
    return {
      count: 911
    }
  },
  methods: {
    toB () {
      eventBus.$emit('myEvent', this.count)
    }
  }
}
</script>
com-b.vue
<template>
  <div>B组件 {{myCount}}</div>
</template>
<script>
import eventBus from './eventBus.js'
export default {
  name: 'ComA',
  data () {
    return {
      myCount: null
    }
  },
  created () {
    eventBus.$on('myEvent', data => {
      this.myCount = data
    })
  }
}
</script>
总结: 事件总线eventBus就是一个对象,提供事件绑定和事件触发功能,其他组件使用这个eventBus进行事件绑定和事件触发进行传参,可以解决非父子组件传值问题。
# 01-vuex介绍
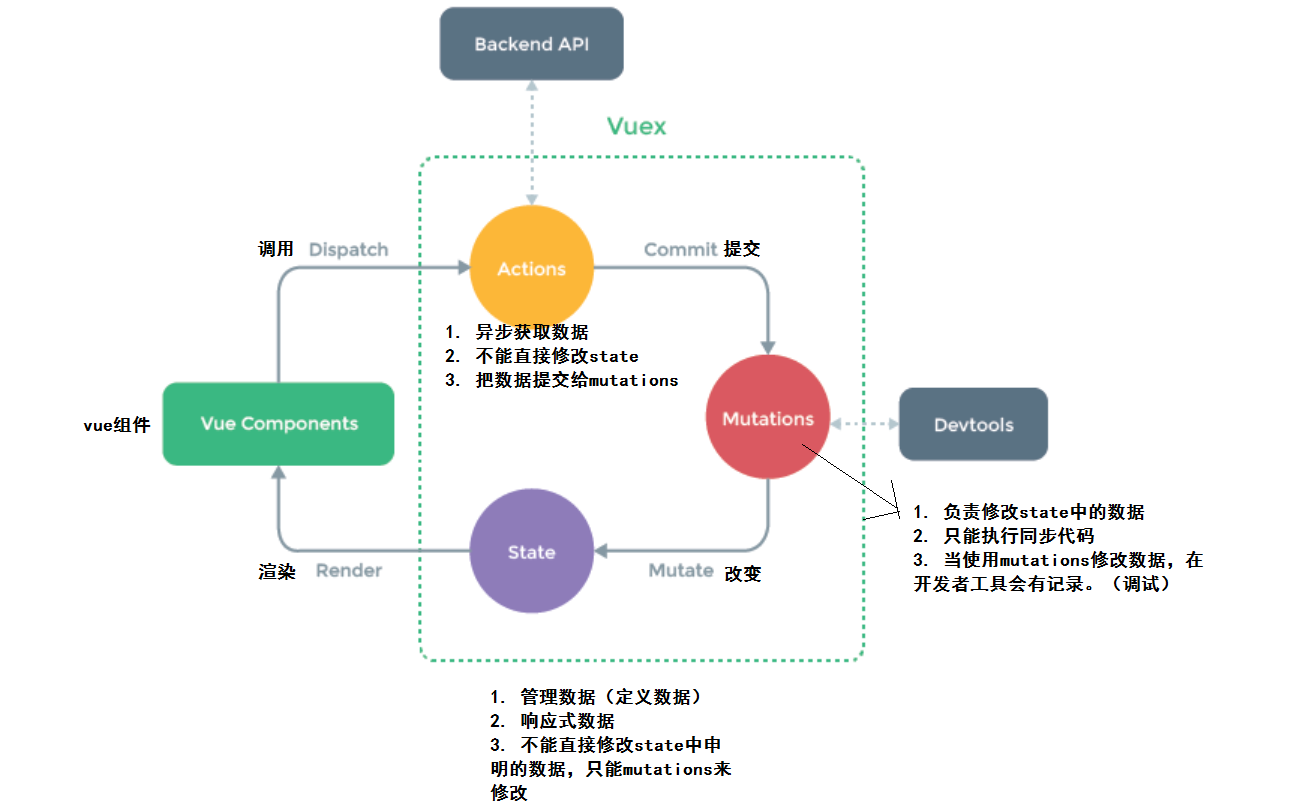
目的:记住vuex的核心概念:state mutations actions
Vuex 是一个专为 Vue.js 应用程序开发的状态管理模式。它采用集中式存储管理应用的所有组件的状态,并以相应的规则保证状态以一种可预测的方式发生变化。
我们理解:
- vuex是采用集中式管理组件依赖的共享数据的一个工具vue插件,可以解决不同组件数据共享问题。

看图结论:
- state 管理数据,管理的数据是响应式的,当数据改变时驱动视图更新。
- mutations 更新数据,state中的数据只能使用mutations去改变数据。
- actions 请求数据,响应成功后把数据提交给mutations
# 02-vuex使用
目的:掌握vuex基本步骤
具体步骤:
- 第一步:
npm i vuex --save - 第二步: 创建store/index.js
import Vuex from 'vuex'import vue from 'vue' - 第三步:
Vue.use(Vuex) - 第四步:
const store = new Vuex.Store({...配置项}) - 第五步:导出
export default store - 第六步:导入main.js 在根实例配置 store 选项指向 store 实例对象
// 初始化一个vuex的实例(数据仓库) 导出即可
import Vuex from 'vuex'
import Vue from 'vue'

// 使用安装
Vue.use(Vuex)

// 初始化
const store = new Vuex.Store({
  // 配置(state|mutations|actions)
})

export default store
+import store from '@/store'

new Vue({
+  store,
  render: h => h(App),
}).$mount('#app')
总结: 和vue-router的使用方式一样。初始化 new Vuex.Store()
# 03-vuex的state
目的:掌握在vuex中如何定义数据,在组件中如何使用数据。
大致内容:
- 定义数据
- 使用数据
- 通过this直接使用
- computed选项中使用
- mapState辅助函数使用
落地代码:
- 定义数据
// 初始化vuex对象
const store = new vuex.Store({
  state: {
    // 管理数据
    count: 0
  }
})
- 使用数据
通过this直接使用
<div>A组件 state的数据:{{$store.state.count}}</div>
created () {
    console.log(this.$store.state.count)
}
computed选项中使用
computed: {
    count () {
        return this.$store.state.count
    }
}
<div>A组件 state的数据:{{count}}</div>
mapState辅助函数使用
import {mapState } from vuex
computed: {
    ...mapState(['count'])
}
<div>A组件 state的数据:{{count}}</div>
# 04-vuex的mutations
目的:知道定义mutations函数修改vuex中的数据
大致内容:
- 定义mutations函数
- 使用mutations函数
- 通过this直接使用
- mapMutations辅助函数使用
落地代码:
- 定义mutations函数
const store = new vuex.Store({
  state: {
    count: 0
  },
  mutations: {
    // 修改数据的函数
    add (state) {
      state.count ++
    },
    // 带参数修改数据的函数
    add2 (state, payload) {
      // payload 是传参的意思
      state.count += payload
    }
  }
})
- 使用mutations函数
通过this直接使用
this.$store.commit('add')
this.$store.commit('add2', 10)
mapMutations辅助函数使用
import {mapMutations } from vuex
methods: {
  ...mapMutations(['add','add2'])
}
<button @click="add">累加1</button>
<button @click="add2(10)">累加10</button>
# 05-vuex的actions
目的:知道定义actions函数获取数据
大致内容:
- 定义actions函数
- 使用actions函数
- 通过this直接使用
- mapActions辅助函数使用
落地代码:
- 定义actions函数
actions: {
  // 异步获取数据
  getData (ctx, payload) {
    // ctx 是vuex的执行上下文,理解成this
    setTimeout(()=>{
	  const data = 100
      // 通过mutations修改数据
      ctx.commit('add2', data)
    },1000)
  }
}
- 使用actions函数
通过this直接使用
this.$store.dispatch('getData')
mapActions辅助函数使用
import {mapActions } from vuex
methods: {
  ...mapActions(['getData'])
}
<button @click="getData">获取数据</button>
# 06-vuex的getters
目的:知道如何在vuex中定义计算属性getters
大致内容:
- 定义getters数据(理解成vuex中的计算属性)
- 使用getters数据
- 通过this直接使用
- computed中使用
- mapGetters辅助函数使用
落地代码:
- 定义getters数据
state: {
  count: 10
},
// 基于state得到一个新数据
getters: {
  cubeCount (state) {
    return Math.pow(state.count, 3)
  }
}
- 使用getters数据
通过this直接使用
this.$store.getters.cubeCount
<div>{{$store.getters.cubeCount}}</div>
computed中使用
computed: {
  cubeCount () {
    return this.$store.getters.cubeCount
  }
}
<div>{{cubeCount}}</div>
mapGetters辅助函数使用
import {mapGetters } from vuex
computed: {
  ...mapGetters(['cubeCount'])
}
<div>{{cubeCount}}</div>
# 07-vuex的modules
目的:掌握vuex中分模块的写法,modules配置选项的使用。
在new Vuex.Store({}) 的配置对象中数据函数越来越多不利于维护,vuex给我们提供了 modules 选项来拆分模块。
大致内容:
- 定义模块
- 注册模块
- 使用模块的:state,getters,mutations,actions 会有问题
- 建议使用带命名空间的模块的:state,getters,mutations,actions
落地代码:
- 定义模块, 注册模块
import Vuex from 'vuex'
import Vue from 'vue'

Vue.use(Vuex)

// A模块
const moduleA = {
  // 开启命名空间:让你的state mutations getters actions 完全分割
  namespaced: true,
  // 避免数据污染,模块中state建议写成函数
  state () {
    return {
      count: 100
    }
  },
  getters: {
    cubeCount (state) {
      return Math.pow(state.count, 3)
    }
  },
  mutations: {
    add (state) {
      state.count++
    }
  },
  actions: {
    getData (ctx) {
      setTimeout(() => {
        // 获取数据成功
        ctx.commit('add')
      }, 1000)
    }
  }
  // mutations getters actions
}
// B模块
const moduleB = {
  namespaced: true,
  // 避免数据污染,模块中state建议写成函数
  state () {
    return {
      count: 10000
    }
  },
  mutations: {
    add (state) {
      state.count += 100
    }
  }
  // mutations getters actions
}

const store = new Vuex.Store({
  // state mutations actions getters
  // 不建议直接这里定义
  // 建议再 modules 配置选项定义模块
  modules: {
    a: moduleA,
    b: moduleB
  }
})

export default store
- 使用带命名空间的模块的:state,getters,mutations,actions
<template>
  <div class="com-a">
    A组件 {{$store.state.a.count}} {{count}}
    <button @click="$store.commit('a/add')">累计1</button>
    <button @click="add">累计1</button>

    <button @click="$store.dispatch('a/getData')">发请求获取数据</button>
    <button @click="getData">发请求获取数据</button>
    <br>
    {{$store.getters['a/cubeCount']}} ---- {{cubeCount}}
  </div>
</template>
<script>
import { mapState, mapMutations, mapActions, mapGetters } from 'vuex'
export default {
  name: 'ComA',
  computed: {
    // 'a' 模块名称  ['count'] 模块中的state数据名称
    ...mapState('a', ['count']),
    ...mapGetters('a', ['cubeCount'])
  },
  methods: {
    // 定义了add函数调用 this.$store.commit('a/add')
    ...mapMutations('a', ['add']),
    // 定义了getData函数调用 this.$store.dispatch('a/getData')
    ...mapActions('a', ['getData'])
  }
}
</script>
需要带上模块名称 模块名称/函数名称 使用辅助函数 (模块名称,[函数名称,...])
小结一下:
- 建议使用模块都带上命名控件,这样分割的更彻底,更好维护。
# 08-vuex案例-准备代码
目的:准备案例基础代码(克隆仓库)
大致步骤:
- 克隆仓库
- 安装依赖
- 启动案例
- 了解结构
落地内容:
- 克隆仓库
git clone https://gitee.com/zhoushugang/vuex-cart-demo.git
- 安装依赖
cd vuex-cart-demo
npm i
- 启动案例
npm run serve
- 了解结构

# 08-vuex案例-准备接口
目的:准备后台接口(json-server)
大致步骤:
- 安装工具
- 初始数据
- 启动接口
- 测试接口
落地内容:
- 安装工具
npm i json-server -g
- 初始化数据
新建一个目录 json-server 目录名称自定义,进入目录新建文件 db.json
{
  "cart": [
    {
      "id": 100001,
      "name": "低帮城市休闲户外鞋天然牛皮COOLMAX纤维",
      "price": 128,
      "count": 2,
      "thumb": "https://yanxuan-item.nosdn.127.net/3a56a913e687dc2279473e325ea770a9.jpg"
    },
    {
      "id": 100002,
      "name": "网易味央黑猪猪肘330g*1袋",
      "price": 39,
      "count": 10,
      "thumb": "https://yanxuan-item.nosdn.127.net/d0a56474a8443cf6abd5afc539aa2476.jpg"
    },
    {
      "id": 100003,
      "name": "KENROLL男女简洁多彩一片式室外拖",
      "price": 128,
      "count": 2,
      "thumb": "https://yanxuan-item.nosdn.127.net/eb1556fcc59e2fd98d9b0bc201dd4409.jpg"
    }
  ]
}
- 启动接口
json-server db.json
- 测试接口 https://getman.cn/ 一个在线工具(和postman一样)

# 09-vuex案例-配置安装vuex
目的:安装并且配置vuex的store代码
具体步骤:
- 安装 vuex
- 新建vuex模块,创建store实例
- main.js使用store实例
落地内容:
运行如下的命令安装 vuex:
npm i vuex@3.6.2 -S在
src目录下新建store文件夹,并在src/store目录下新建index.js模块:import Vue from 'vue' import Vuex from 'vuex' // 1. 把 Vuex 安装为 Vue 的插件 Vue.use(Vuex) // 2. 创建 store 实例 const store = new Vuex.Store({ // 注册模块 modules: {}, }) // 3. 向外共享 store 实例 export default store在
main.js入口文件中,导入并挂载 store 模块:import Vue from 'vue' import App from './App.vue' // 1. 导入 store 模块 import store from '@/store/index' Vue.config.productionTip = false new Vue({ render: h => h(App), // 2. 挂载 store store, }).$mount('#app')
# 09-vuex案例-新建cart模块
目的:创建配置cart的vuex数据模块
大致步骤:
- 新建模块文件,基本配置
- 在仓库注册模块
落地内容:
在
@/store/目录下新建cart.js购物车模块:// 1. 定义购物车模块 const moduleCart = { // 1.1 开启命名空间 namespaced: true, // 1.2 数据 state: () => ({}) } // 2. 向外共享购物车模块 export default moduleCart在
@/store/index.js模块中,导入并注册购物车模块:import Vue from 'vue' import Vuex from 'vuex' // 1. 导入购物车模块 import moduleCart from './cart' Vue.use(Vuex) const store = new Vuex.Store({ modules: { // 2. 注册购物车模块 cart: moduleCart, }, }) export default store
# 10-vuex案例-渲染列表
目的:使用vuex处理商品列表数据
大致步骤:
- 安装下axios
- vuex中state定义购物车商品列表数据
- 定义修改商品列表数据的mutations函数
- 定义获取商品列表数据的actions函数,获取后调用mutations函数进行修改
- 在 app.vue 组件初始化调用actions获取数据,组件进行渲染
落地代码:
- 安装axios
npm i axios
- 定义商品列表数据
const moduleCart = {
  namespaced: true,
  state: () => ({
      list: []
  })
}
- 定义修改商品列表mutations函数
mutataions: {
    updateList (state, payload) {
        state.list = payload
    }
}
- 定义获取商品列表actions函数
actions: {
    getList (ctx) {
      axios.get('http://localhost:3000/cart').then(res=>{
          ctx.commit('updateList', res.data)
      })
    }
}
- 在App组件获取数据,进行渲染
import { mapState } from 'vuex'

export default {
  name: "App",
  created () {
    this.$store.dispatch('cart/getList')
  },
  computed: {
    ...mapState('cart',['list'])
  },
    <!-- 商品 Item 项组件 -->
    <es-goods
      v-for="item in list"
      :key="item.id"
      :id="item.id"
      :title="item.name"
      :thumb="item.thumb"
      :price="item.price"
      :count="item.count"
    ></es-goods>
# 11-vuex案例-计算总件数和总价
目的:渲染页面上的 件数总和,和总价格。
大致步骤:
- 在vuex中使用getters计算件数和价格
- 在App.vue 使用数据
落地代码:
- 在vuex中使用getters计算件数和价格
  getters: {
    total (state) {
      return state.list.reduce((p,c)=>p+c.count,0)
    },
    amount (state) {
      return state.list.reduce((p,c)=>p+c.count*c.price,0)
    }
  },
- 在App.vue 使用数据
<template>
  <div class="footer-container">
    <!-- 中间的合计 -->
    <div>
+      <span>共 {{total}} 件商品,合计:</span>
+      <span class="price">¥{{amount}}</span>
    </div>
    <!-- 右侧结算按钮 -->
    <button class="btn btn-success btn-settle">结算</button>
  </div>
</template>

<script>
+import { mapGetters } from 'vuex'
export default {
  name: 'EsFooter',
  computed: {
+    ...mapGetters('cart', ['total','amount'])
  }
}
</script>
# 12-vuex案例-修改数量
目的:完成修改商品数量功能
大致步骤:
- 定义修改数量的mutations函数
- 定义修改数量的actions函数
- Goods组件中修改数量的时候调用actions函数
落地代码:
- 定义修改数量的mutations函数
    updateCount (state, payload) {
      const goods = state.list.find(item=>item.id === payload.id)
      goods.count = payload.count
    }
- 定义修改数量的actions函数
    updateCount (ctx, payload) {
      axios.patch('http://localhost:3000/cart/'+payload.id,{
        count: payload.count
      }).then(res=>{
        ctx.commit('updateCount', payload)
      })
    }
- Goods组件中修改数量的时候调用actions函数
          <!-- 按钮区域 -->
          <button class="btn btn-light" @click="onBtnClick(-1)">-</button>
          <span class="count">{{count}}</span>
          <button class="btn btn-light" @click="onBtnClick(1)">+</button>
  methods: {
    onBtnClick (step) {
      const newCount = this.count + step
      if (newCount < 1) return
      // 发送修改数量请求
      this.$store.dispatch('cart/updateCount',{id:this.id,count: newCount})
    }
  }